Brewie: Sniffing the Control Board UART

Sticky Fingers

Being a hacker at heart means you just can’t leave things well enough alone. I really wanted to see if I could see how the touch screen control system software interfaced with the Brewie’s control board. Basically how the software tells the machine’s parts to work a recipe…

Incidentally, the Brewie’s control board is based around the ATMEGA2560. Could it be they are running an Arduino base in this?

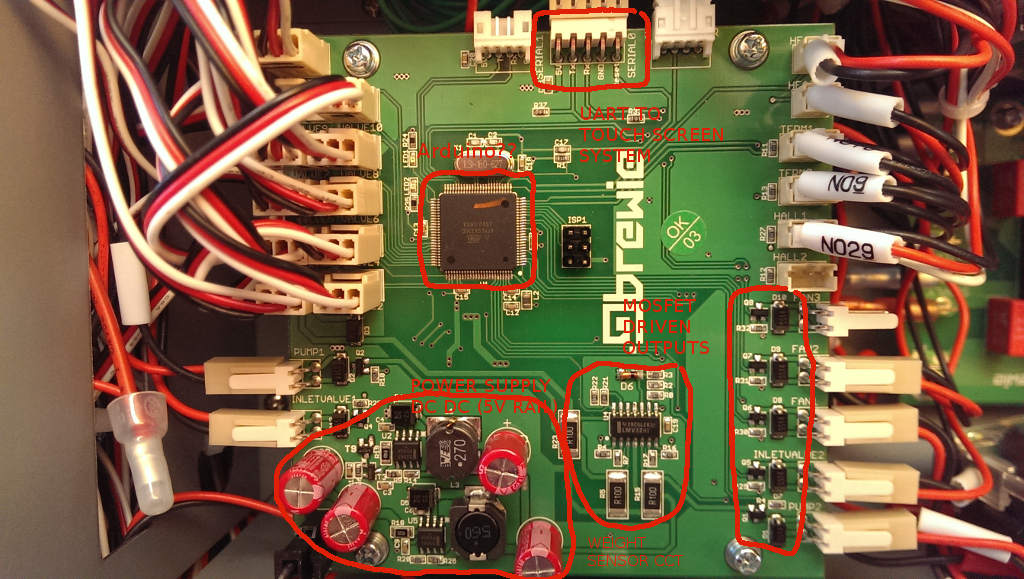
The control board is nicely laid out with their own DC DC converted 5V rail from the 12V board supply. They are using MC33063A Buck converter ICs. Pretty standard stuff.

Datasheet here: http://www.ti.com/lit/ds/symlink/mc33063a-q1.pdf 

A bunch of control outputs driven by mosfets with protection diodes.

An op-amp circuit to provide weight sensor inputs to the micro.

The money shot

The prize here is the Connector Marked SERIAL0. The pinout of SERIAL0 is shown below:

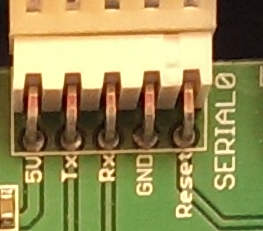
It is obvious that the Touch screen control system which runs the Brewie software and is connected to the internet is able to flash a new firmware on the ATMEGA2560 since the DTR/Reset pin is exposed to it.

Well simple enough we can sniff this using another ATMEGA2560 or in my case an Arduino MEGA board.

The right connections

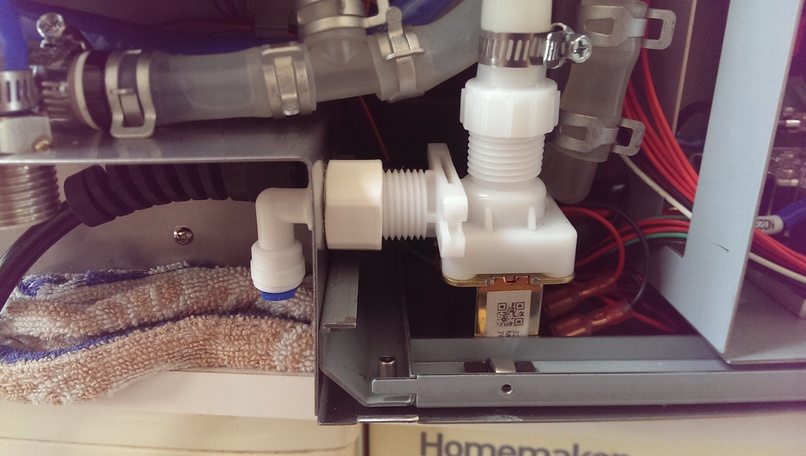
I soldered directly onto the pins of the Brewie board to allow me to have a connector outside the machine.

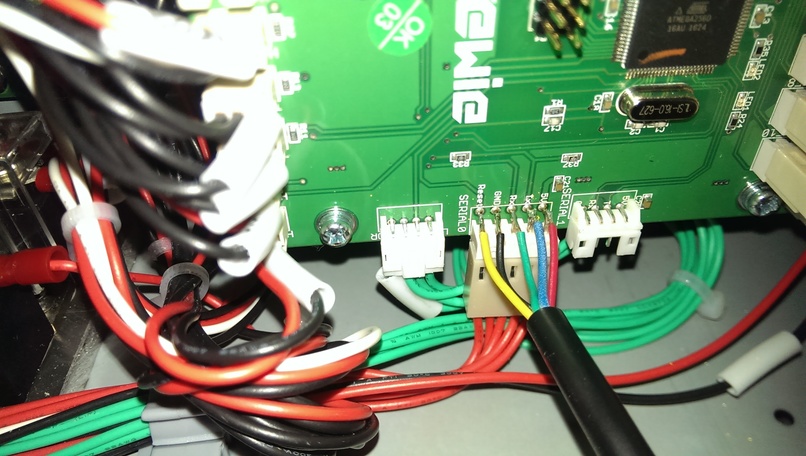
I now have a “DIAGNOSTIC” port on my Brewie that is sealed from moisture ready to use whenever I want to. I have plans to build a debug screen that allows me to see the raw data represented as more intuitive visuals compared to the crappy touch screen software…Sorry Brewie…it really does suck although its nice to see you are slowly but surely ironing out all the bugs…

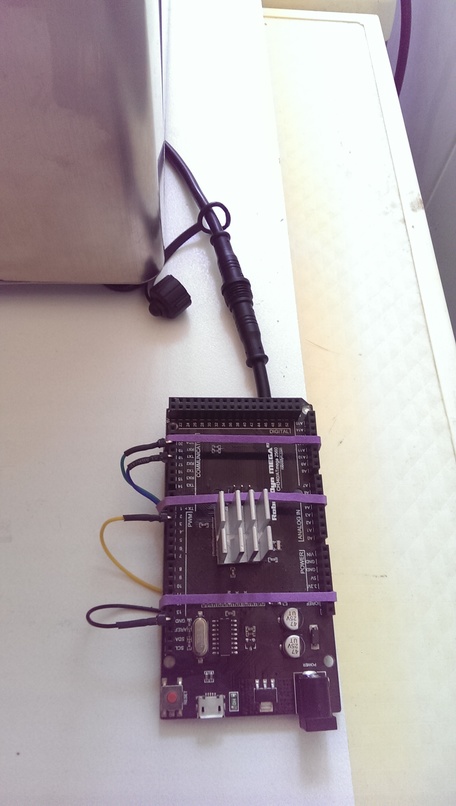
The pinout connection is up to you but if you want to use my sketch then follow the pin configuration below:

The Sketch

I wrote a quick sketch that allows me to dump the Brewie’s “Conversation” to Serial output. I figured out that the communications are happening at a baud rate of 115200.

Download the Sketch  BrewieUARTSniffer.ino

Sample Output

It’s alive! I could now watch the Brewie’s conversation as it prepares a recipe.  The Brewie control board sends data every second or so in a fixed format with fields separated by TAB characters.

Download a log I captured: brewie-log-20171112-1900.log

Example at the start:

-----------------------------------------------------
Brewie Control Board UART Sniffer V1.0
Written by DrGus
Copyright 2017 DrGus
-----------------------------------------------------
Rst Brewie Control Board Reset!
Tx Brewie v1.0
Tx Copyright Brewie 2016
Rst Brewie Control Board Reset!
Tx #Brewie v1.0
Tx Copyright Brewie 2016
Tx Water level nullpoint: 333142
Tx -1 0 V5 89 0.0055075451 85.0000000000 85.0000000000 850.0000000000 850.0000000000 0 0 0 460 0 480 0 0 83 85.0000000000
Tx -1 0 V5 161 0.0099630868 30.8750000000 34.3750000000 308.0000000000 343.0000000000 0 0 0 460 0 480 0 0 45 30.0000000000
Tx -1 0 V5 251 0.0155325140 30.8750000000 34.3750000000 308.0000000000 343.0000000000 0 0 0 460 0 480 0 0 45 30.0000000000 

...and so on.

NOTE: The Rx, Rst and Tx prefixes are added by me to allow me to know which direction the information is going in. It is not present in the Brewie communications.

Analysing the data format

The data format appears to be fairly simple. I will provide the fields once I have reverse engineered it.

Example of a data sentence sent by the control board to the Touch Screen software. I picked this entry as it has some “rich” data in it.

1 199 60 0 V5 64983 5.1403689000 30.5625000000 23.9375000000 314.0000000000 251.0000000000 0 0 0 460 0 328 0 0 843 P103 2 0 1 0 0 0 0 0 0 0 0 0 0 0 255 0 90 5 0 0 1 29.5000000000
Field NumberFunction/Description
1Recipe Step/Increment. Default 0 or -1
2Time in seconds since the recipe started
3Time in seconds since the last step change or current Step Time
4Countdown time in seconds for a step to complete
5Firmware Version Number
If a prefix appears, its:
P103,V5 <- asking for next step
E101,V5 <- An error has occured
6Weight Raw value (Raw Water Level)
7Weight in kg (Water Level)
8Mash Tank Temperature in Degrees Centigrade
9Boil Tank Temperature in Degrees Centigrade
10Mash Tank Temperature as Centidegrees-Centigrade
11Boil Tank Temperature as Centidegrees-Centigrade
12Hall 1 RPM - Mash Pump
13Boil Pump
14Pump+Valve State
1->Pump ON
2->Pump ON+Mash to Boil Valve Open
15Hall 2 RPM
16Pump+Valve State
17Unknown
18Valve State
19Valve State
20Unknown
21Command Echo. When the Touch screen board sends a command to the controller, the controller echos it back in this field.
Default: blank
22System Temperature in Degrees Centigrade. There is a DS18B20 temperature sensor attached to the tray where the control board is fitted.

Analysing the command format

The command format also appears to be fairly simple. Below are the Brewie commands I have identified thus far. I will be analysing the structure soon to provide the functions of each field.

P80 12641.7 0 0.842726 1.22634

Command P80… It appears when the touch screen system first communicates with the control board

Command P101 “Step Init” So P101 <step count>

P103 0 1 0 0 0 0 0 0 0 0 0 0 0 0 0 50 0 1 0 0 0 
P103 1 0 0 0 0 540 0 0 0 0 0 0 0 0 0 0 1440 3 0 0 0 
P103 2 0 1 0 0 0 0 0 0 0 0 0 0 0 255 0 90 5 0 0 1
P103 3 1 0 0 0 0 0 0 0 0 0 0 0 0 0 50 30 1 0 0 0 
P103 4 0 1 0 640 0 0 0 0 0 0 0 0 255 0 0 180 2 0 1 0 
P103 5 0 1 0 640 700 0 0 0 0 0 0 0 255 0 0 900 6 0 1 0
P103 6 0 1 0 700 0 0 0 0 0 0 0 0 255 0 0 0 2 0 1 0 
P103 7 0 0 1 0 700 0 0 0 0 0 0 0 0 255 0 600 6 0 0 1 
P103 8 0 0 1 0 700 0 0 0 0 0 0 0 0 255 0 0 3 0 0 1 
P103 9 0 1 1 700 700 0 0 0 0 0 0 0 255 255 0 600 6 2 1 1 
P103 10 0 0 1 0 0 0 0 0 0 0 0 0 255 0 0 180 4 0 1 0 
P103 11 0 0 0 0 980 0 0 0 0 0 0 0 0 0 0 300 6 0 0 0 
P103 12 0 0 1 0 0 0 0 0 0 0 0 0 255 0 0 180 4 0 1 0 
P103 13 0 0 0 0 980 0 0 0 0 0 0 0 0 0 0 300 6 0 0 0 
P103 14 0 0 1 0 0 0 0 0 0 0 0 0 255 0 0 180 4 0 1 0 
P103 15 0 0 0 0 980 0 0 0 0 0 0 0 0 0 0 300 6 0 0 0 
P103 16 0 0 1 0 0 0 0 0 0 0 0 0 255 0 0 180 4 0 1 0 
P103 17 0 0 0 0 980 0 0 0 0 0 0 0 0 0 0 300 6 0 0 0 
P103 18 0 0 1 0 0 0 0 0 0 0 0 0 255 0 0 180 4 0 1 0 
P103 19 0 0 0 0 0 0 0 0 0 0 0 0 0 0 0 1800 7 0 0 0 
P103 20 0 0 0 0 0 1 0 0 0 0 0 0 0 255 0 300 6 3 0 1 
P103 21 0 0 0 0 0 1 1 0 0 0 0 0 0 255 0 300 6 3 0 1 
P103 22 0 0 0 0 0 1 1 1 0 0 0 0 0 255 0 180 6 3 0 1 
P103 23 0 0 0 0 0 1 1 1 1 0 0 0 0 255 0 120 6 3 0 1 
P103 24 0 0 0 0 0 0 0 0 0 1 0 0 0 255 0 120 6 0 0 1 
P103 25 0 0 0 0 230 0 0 0 0 1 255 0 0 255 0 1380 10 0 0 1 
P103 26 0 0 0 0 0 0 0 0 0 0 0 0 0 0 0 600 8 0 0 0

Command P103 … is the “Write Step” Command.

P103 <index> <inlet> <mashingvalve> <boilingvalve>  <mashing temp> <boiling temp>  <hop 1> <hop 2> <hop 3> <hop 4> <cooling> <fan> <outlet> <mashing pump> <boiling pump> <water level> <time> <condition> <auxCondition> <mashing One Way> <boiling One way>

Command P200 is “Start Brew”

Command P201… is “Pause Brew”

Command P202…is “Continue Brew”

Command P204  is “Next Step”

Command P999 tells the control board to STOP

Serial Logging to File

For those wondering how I captured the Serial log to file, I used a terminal window in Ubuntu.

Using this command:

(stty raw; cat > brewie-log-20171112-1900.log) < /dev/ttyUSB0

Sniffer Cable

If you don’t wish to solder directly to the board, you can make up an interfacing cable that has a Molex KK 2.54 Male socket and female plug with wires that extend out to an LED type connector as shown below.

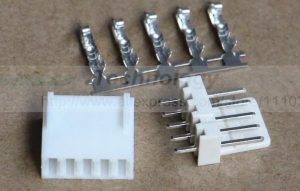
If you want these connectors you can buy them using the link below as it helps me out without costing you anything extra.

http://ali.pub/20opbg

You can then create an external connection point via this cable set. These come in a pair (5pins female and male) pre-terminated for ease and are IP66 rated.

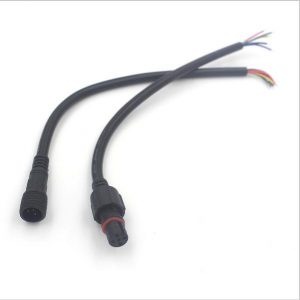
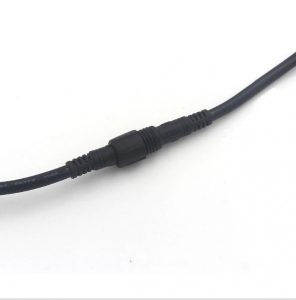
You can buy them using the link below as it helps me out without costing you anything extra.

http://ali.pub/20opva


Brewie: Adding an additional inlet for filtered water

Brewie B20 is a fully automatic all-grain wort producing machine. It can do up to 22L batches although its great for 19L. The four hop additions are automatic however you can keep going if you manually change the hops.

My Brewie Arrives

I recently became the owner of a Brewie Automatic Brewing Machine. The unit arrived in a well packed box with all the necessary items for creating the wort for all grain beer recipes.

One Fitting to Rule them All

One thing I immediately noticed and didn’t like was the fact that you could not choose the sources of water for wort chilling vs the wort itself. I wasn’t about to make my beer out of tap water and I also don’t want to waste filtered RO water for the chilling process. So I hacked it.

Bits you will need

You will need the following items to allow your Brewie to have two separate water inlets. The existing inlet is converted to only supply water to the chiller. A new inlet is created to supply filtered water to the brewing process circuit.

12vdc DN15 solenoid

The Brewie’s existing water distribution is achived via a single inlet DN20, dual solenoid valve that feeds the chiller circuit and the tank fill circuit.

The solenoid below has a DN15 (1/2″ BSP) thread inlet and a DN15 (1/2″ BSP) thread outlet. It has a 12Vdc coil with two spade terminals. These specifications are important for our modifications.

You can buy this solenoid on Aliexpress using my link as it helps me out without any extra cost to you.

http://ali.pub/20ka04

DN15 to 12mm barb adapter

This adapter goes onto the OUTLET of the solenoid. Note DN15 is 1/2″ BSP. Since we will be using the Brewie’s existing hose we need the barb to be 12mm.

You can buy this adapter on Aliexpress using my link as it helps me out without any extra cost to you.

http://ali.pub/31bc63

DN15 to 1/4″ QUICK FIT adapter

This adapter goes onto the INLET of the solenoid. Note DN15 is 1/2″ BSP. If you want to use a straight version of this adapter that is fine too.

You can buy this adapter on Aliexpress using my link as it helps me out without any extra cost to you.

http://ali.pub/20kacr

TOOLS REQUIRED
  1. Step drill bit 20mm hole required
  2. Drill machine
  3. Screwdrivers (Phillips)
  4. Pliers (to remove hoseclamps)
  5. Scissors (to cut hose)
Other Bits

You may think you need hose clamps but you don’t. Because we are removing a pipe from the Brewie there will the right amount of hose clamps to do the job.

Making the Modification

WARNING

Make sure the machine is FULLY DRAINED of liquids 
and the power has been DISCONNECTED before proceeding.

You will need to lay the machine on its front side / back side and then proceed to remove the bottom cover. Basically unscrew the four black feet and remove all of the phillips head screws EXCEPT the screws holding the fans in place.

You can choose to disconnect the fans from the Brewie Control Board or just leave them connected.

The next stage is to remove the hoses connected to the water inlet solenoids.

You should then remove the existing solenoid assembly and take note of the markings. My unit’s chiller solenoid wires were marked as “C”.

“14” Wires are the for the water inlet solenoid.

Re-route the “14” wires to the centre of the unit where the hop tanks are. You will need to undo some cable clips to do this.

Move the “C” wires from the existing solenoid to the other solenoid. We are doing this to move the chiller input solenoid to the back now.

Remove the backing plate shown below:

Drill a 20mm hole near the power cord inlet. This is where the new DC solenoid will meet the outside world as shown below.

Reassemble the backing plate and fit the solenoid into place. Plug in the rerouted solenoid control wires into this solenoid.

Route the hose in the following manner and secure using the left over hose clamps.

NOTE: There is a check valve on the Tee piece where the hose connects…make sure it is in the right direction if you need to remove it.

That’s it you’re done. Put everything back together and give the machine a test run. You will now be able to have a separate water inlet for your filtered water that is only used for making wort. Straight tap water is used to chill the wort…

Build your own Searzall head for under $10

Sears All

Well as it gets more difficult to source a Searzall torch head; the item has been unavailable for a while now even from Amazon….Amazingly the price isn’t exactly cheap….so I said fark it… Im building one.

Ok what do I need? Lets examine the unit itself…


It would appear that effectively its a radiant heat device. The “high temp mesh” is probably some stainless steel mesh that does not corrode and acts as the radiator.

Ok well this looks easy enough to build?

Analysis?

What would it take to build one?

  • A adapter that allows the head to float off the torch body to reduce the heat soak; this can be done using 316L stainless steel filler rod 1.6mm
  • A mesh  or series of meshes designed to sit at the edge of the flame envelope
  • A way of channeling the heat through the mesh

DIY Route

As I see it, you need a stainless steel chamber that is suspended from the torch head to prevent heat moving back into the torch. The front of the chamber needs to have mesh that is capable of handling the heat.

EDIT: If you want to create insulation, you could NEST two of the chambers; a smaller one inside the larger one separated by high temperature ceramic/glass wool.

Medium Chocolate Powder dispenser

I found a medium sized chocolate duster that is used for coffee art. The size of the medium unit is almost on par with the Searzall unit.

  • 6cm diameter
  • 8cm tall
  • Medium size

Available from Aliexpress. Please use my link below as it helps me out at no extra cost to you. Make sure you get the MEDIUM SIZE.


All you have to do is drill a 20mm hole in the base large enough to allow the flame from the torch to not heat the dispenser itself.

Here are a list of affiliate links for this shaker. Your support benefits me without extra costs to you.

Source 1: http://ali.pub/2h2bjd 

Source 2: http://ali.pub/2h2bqr

Source 3: http://ali.pub/2h2bqy

Source 4: http://ali.pub/2h2brq

STAINLESS MESH

You can get this Mesh online. The size/grade you are after is “30”.

You can get it on Aliexpress. Please use my link below as it helps me out at no extra cost to you. Make sure you get the SIZE 30. This is the size that worked best for me.

Also make sure you get enough to make plenty of spare screens for your searing tip. As intially while you set this thing up you may burn them up.

Take a sharp kitchen scissors and cut circles to suit the powder dispenser. You want the fit to be fairly tight. For my tip I used 2 screens together as per Searzall. I also left the original screen in the dispenser but you can choose to remove it.

Source 1: http://ali.pub/20k7lz

Source 2: http://ali.pub/2h2bvf

Source 3: http://ali.pub/2h2by5


Stainless Steel TIG Welding wire 1.6mm

I have plenty of TIG filler rods around. Why not use it as the frame for our torch head?


Basically bend into shape and tack weld to the dispenser. Bend the wires up toward the hole of the dispenser. Leave some excess so you can fine tune it to fit your torch adapter (next item).

DIY TORCH ADAPTER: length of ALUMINIUM MACHIning round

A short length of aluminium 25mm diameter by 25mm long in which a bore to suit your torch tip can be made with a lathe or a drill if you are careful. For my torch it was 15mm so I bored a hole using a 5/8″ (15.8mm) drill bit.

You will need to tap a thread for a grub screw to attach the head to your torch.

Additionally 3 holes need to be drilled in the side of this aluminium to the diameter of the wire / filler rod being  used…

the result

Well I must say for a few hours work it was worth it. It works like a dream….

Say goodbye to the ol “Torch Taste” and enter a level of culinary excellence worthy of a Michelin Star kitchen…

Useful parts at the right price

PARTS PIECES

From time to time I find useful parts at the right price. Below are a list of items that you may find useful in your projects.

These are affiliate links which help me out without any extra cost to you. I do a lot of research on finding the best prices on items to save you the time hunting.

1206 Resistors in multiples of 100 in quite a variety of values.

1206 SMD Resistors (multiple values) http://ali.pub/29sp8r

FYD Opensource Hardware is a very reliable shop on Aliexpress. I have frequent purchases from them and its always on time and well packed. Not to mention its ESD protected unlike some other sellers.

FYD’s prices work well for bulk purchases too…

GP01 GPS Modules http://ali.pub/29sr7q

GP02 GPS Modules http://ali.pub/29sr3u

ESP-M2 Modules http://ali.pub/29srbt

ESP-01M Modules http://ali.pub/29sqva

3D magnetometer GY271 with original HMC5883L IC (Many others use QMC5883)  http://ali.pub/2ad0g9

IF you want the Chinese version QMC5883L IC http://ali.pub/2ad218

5V 2.1A Boost converter, charger, battery protection all in one for 18650 http://ali.pub/2c5dpe

Another 5V 2.1A Boost converter, charger, battery protection all in one for 18650 (NEWER MODEL) http://ali.pub/2c5eh7

1206 SMD resettable fuses http://ali.pub/2cg2fa

1812 SMD resettable fuses http://ali.pub/2cg2v8

WAGO Connectors http://ali.pub/2e9v9y

WAGO Connectors Alternative Color http://ali.pub/2e9v0m

MINI-SAS to 4 PORT SATA BREAKOUT Cable http://ali.pub/2ea0bk

Audi A4 B5 Coolant Sensor 059919501A http://ali.pub/2e9zrx

Black EVA Hot Glue Sticks http://ali.pub/2eshg1

Audi/VW Ecu relay 30 http://ali.pub/2f9tpq

18650 Battery Holders (Good quality) http://ali.pub/2gnpvu

MSSOP10/DFN10/QFN12 to DIP Prototyping boards (50pcs) http://ali.pub/2h5bii

5:1 Potting Compound http://ali.pub/2qfbu1

Gus Brewery

Getting Serious

I have been considering building an all electric brewery for sometime now. An undertaking such as this requires some funds and knowledge about the beer making process.

The Shopping List

Affiliate links. No extra cost to you but it helps me out. This list will keep growing as I continue to build the brewery.

12v 5v 220V power supply module http://ali.pub/22u22c

AF2000-2 Air Filter/Water trap – Essential to catch any spew up from your brew http://ali.pub/249e3b

8mm to 6mm push fit union http://ali.pub/249eg5

G1/4 male to 8mm push fit adapters http://ali.pub/249ezz

G1/4 male to 8mm compression fit adapters Stainless Steel http://ali.pub/249fd0

Bar glass hangers http://ali.pub/24gguh

Water filter tap http://ali.pub/26gdzk

Cupboard handles http://ali.pub/26jxe4

MR16 cupboard lamps http://ali.pub/26qb93

Alternative cupboard handles http://ali.pub/26qcp0

Alternative handles bulk http://ali.pub/26qdlo

Mixer Tap (Oil rubbed bronze) http://ali.pub/27g31z

12V 2A power supply http://ali.pub/27ybgf

0.96INCH OLED I2C DISPLAY http://ali.pub/28dxn6

4.5V to 24V to ADJUST Buck Converter http://ali.pub/28sog7

IRLML6244TRPBF SOT23 MOSFETS http://ali.pub/28zzyd

ESP12E/F Programmer Board http://ali.pub/293vce

ESP12E/F Programmer GOLD Pins http://ali.pub/293vj0

ESP12E/F Programmer NEW http://ali.pub/293vnv

WS2801 http://ali.pub/293wd5

1/4FFL to 8mm barb adapters http://ali.pub/297cr7

8pin sensor cable pairs IP68 http://ali.pub/2acyov

Beer tap tail nut/barb http://ali.pub/2avycv

Refrigeration Service Valves (Convert existing fridge to be serviceable) http://ali.pub/2bl2kt

Refrigeration Filter Drier with service port http://ali.pub/2cd925

5% Silver Copper Phosphorus Brazing Rods http://ali.pub/2d9drl

Flux Powder for Brazing http://ali.pub/2d9e9h

Tron 2010 – Odours and Laps On So You Chong

A bigger dude is chasing a littler dude.

B: Hey man! I aint train to kill yo ass…stop man…wait up!

The littler dude starts to frown, slow down…stops….smiles.

L: I am not running from you because Im scared.
<in a serious condecending manner)
I am only running to protect you from yourself.

B: Big dude goes in for the kill. BAM

Lil dude goes in for the kill as well BANZAI.

Next scene, they are arm in arm walking along with pina coladas.

A slightly large woman decides to visit a friend’s house. She arrives at
the door, presses the bell and waits…

Ding dong

1) The door opens…the large woman looks surprised when she sees
a tiny little woman the sixe of her socks, looking meekishly at the
floor.

2) The large woman welcomes herself in, and they sit.

House woman: Would you like some tea?

Large woman taking off her gloves…

Large Woman: Yes….make it a Lapsang Shoeshank.

Scene ends

A car (exhaust) that sounds like a velvety smooth ass
accelerating chord…like in Star Wars when Anakin was in the city
and chasing that other hover car.

Someone gets outs….

scene ends

TOSENSE CUT-50D Plasma Cutter

VERDICT:  Build quality is quite good. With a few minor modifications you can have a cheap powerful plasma cutter that does the job.

First Impressions

220V 50A Plasma Cutter CUT50 DC Inverter Air Plasma Cutting Machine China Welding Plasma Equipment CUT-50

I ordered the unit from the Tosense Official Aliexpress store. It arrived in a timely manner. The accessories that came with it made it very easy for me.

You get a truckload of spare cups/heads/tips. The Air regulator is a cheapie but it works OK.

The leads are of OK quality and plenty to handle the 50A maximum.

Testing it out

1/2 Inch Steel Beam

A mate wanted to create some legs for his custom rustic table. He brought around this steel looked like it was from the 1900s. The CUT-50D was at its maximum setting and was able to cut it OK.

THIN STEEL PLATE INTRICATE CUT

A test of the machine at a low setting to see if it can cut artwork. So I decided to carve some text into computer case steel, the stuff you can just bend by hand…

Summary

Build quality is quite good. With a few minor modifications you can have a cheap powerful plasma cutter that does the job. I will be pulling it apart soon enough to get an inside view of the internals.

If you want to purchase this plasma cutter, please use the link below as it helps me out without any extra cost to you. It is the official Tosense Aliexpress store.

http://ali.pub/20k7sz


V-Twin Petrol Electric hybrid

Reasoning: The purpose of this design is to create the opportunity for petrol cycle engines to have the ability to turn on and off based on demand without affecting rideability. This in effect would allow the petrol driven engine to have zero emissions at idle and under stop-go cycles.

Good reasoning is like great seasoning.

Components

– The heads are specially modified to run electronically controlled servos that open and close the valves according to a program

– The Engine block itself is stock and standard in design. The crankshaft has a sensor on it to detect engine timing.

– The fuel injection is electronic and the accelerator is “fly by wire” type.

– The ignition system is coil on plug

– The brake and foot levers have microswitches to detect braking action and the electronics can monitor duration of braking and hence intensity when graphed against deceleration calculated from speed.

– The clutch lever has a microswitch

– There is no starter on this bike. The starter is replaced with a geared electric motor with an electric clutch on its gearbox.

– Fuel injector can handle micro pulsing

– Purely oil cooled engine

Operation

Starting

1) Power to the bike and the valves are held  open as the electric motor is running bike

2) When bike is placed in gear, and the clutch released, the valvetrain resumes its cycle and the injection resumes and the electric motor is stopped

3)When the accelerator is released, depending on the time allowed, the engine would shift into electric idle mode where the injection stops, the valves go to fully open state and the electric motor maintains idle state.

4) During acceleration, the motor regenerates the kinetic energy into electrical energy to charge the battery.

5) When the battery is full and under long distance cruising under 1500rpm, the electric motor can provide additional drive torque to reduce fuel usage. This mode is electric assisted.


The ebb and flow of yin and yang

Sexual energy is the result of a pushing and pulling that goes on when yin creates back pressure to yang or when yang creates forward pressure to yin.

If yin allows yangs advance, and yang accelerates yins expansion, there will be no sexual energy.

This can be applied to the dynamics of male/female relationships.