Eakins 16MP 1K/2K/4K Industrial Microscope Review

Weary eyes

As Moore’s law marches on, the size of electronic discrete components gets smaller and smaller. Add to that the unrelenting march of the sands of time, my vision is becoming more long sighted which makes it difficult to focus clearly on things close up. Its time for a decent industrial microscope…

Research

I went through a plethora of youtube videos and blog reviews of various digital microscopes including Dave Jones’ review of the DIYINHK unit and his Tagarno whizbang unit. It got me thinking, what if I could spec a unit that could do pretty much what the Tagarno could do but without the pricetag?

Budget

I set aside a budget of between AUD$200 and AUD$400. I want the best value for my money here. It would be nice to have this thing working for at least 5-10 years.

Requirements

It was clear, I need:

  • HDMI output to an external monitor, at least 1080p, ideally 60fps
  • USB output in the event I want to utilise a PC for analysis
  • Storage to an flash device to take photos/videos of work for clients, especially electronic forensic work
  • A decent and usable focal range without ridiculous magnification
  • A sturdy stand with a large enough work area or at least a stand that can be modified
  • A large enough working distance
  • Auto-focus, but not not really required…

Candidate

Enter the Eakins 16MP 1080p 60fps unit. Its a bit annoying that they don’t have a model number for this package.

What the package comes with:

  • 1 x Camera
  • 1 x Power supply(EU/AU)
  • 1 x 180X/300X Zoom C-mount Lens
  • 1 x Camera Big Stand
  • 1 x 144 LED Ring Light
  • 1 x HDMI cable

The Camera’s Specifications:

  • Sensor: 1 / 2.33 inch Panasonic 16 million pixel CMOS sensor
  • Pixel size: 1.335 μm × 1.335 μm
  • HDMI output: 1920 * 1080 60 frames, 2K at 25 frames, 4K at 25 frames
  • USB output: 1920 * 1080/30 1280 * 720/30 640 * 480/30 320 * 240/30 (MJPG)
  • Lens Interface: C / CS
  • Exposure: Auto / Manual
  • Exposure compensation: support
  • White balance: automatic / manual, support RGB adjustable
  • Storage: Maximum support 64GB
  • Input voltage: “DC 5V-12V
  • Scribe line support 8 lines, color, thickness and position adjustable
  • Centerline: support
  • Menu Language: English / Chinese
  • Remote control: support remote control operation
  • Net weight: 250 grams
  • Gross weight: 450 grams
  • Product Size: 66 * 66 * 49mm
  • Packing size: 145 * 130 * 70mm

The lens I chose was the 180x version:

  • Type C-MOUNT Lens
  • Working distance: 95mm
  • Zoom c-mount Lens 0.5X C-mount adapter
  • Zoom ratios: 6.5:1
  • Objective Magnification Power by 0.7 – 4.5X(about 10 – 180X/300X on the display)
  • Size: 180mm(L) * 50mm(DIA)

The light source they supplied:

  • 144 bright white LED bulbs
  • 100,000 hours of life
  • The brightness of 0-100% Adjustable brightness
  • Power input: 100-240V, 50-60HZ
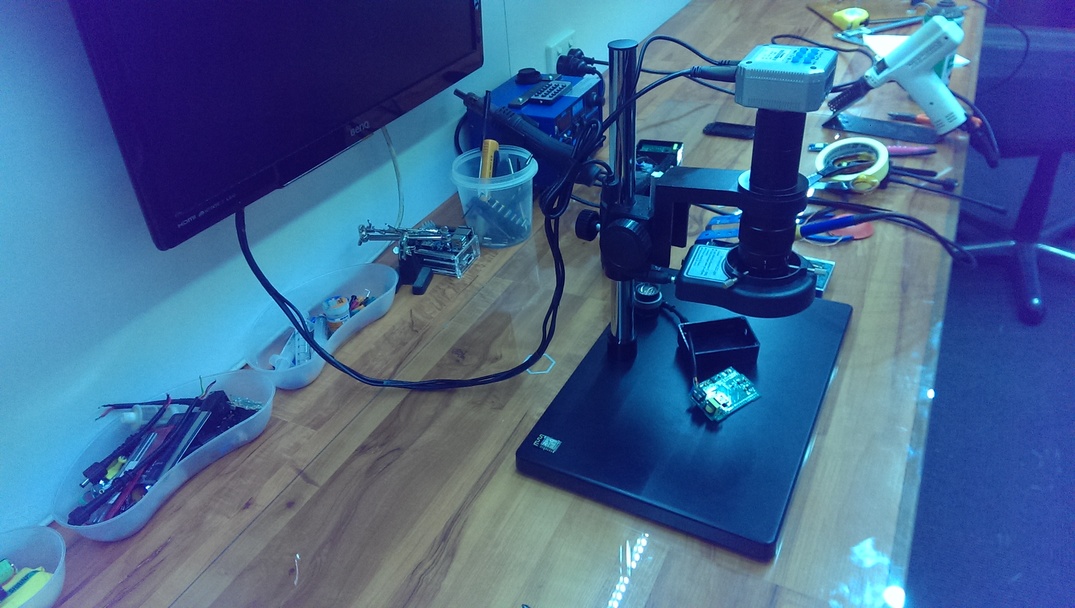
My setup

I decided I would wall mount the 24″ monitor and place the microscope smack bang in the middle of the work area.

I lay glass over the nice benchtops then sat the rig ontop of that.

First Impressions

Out of the box things feel solid. Indeed the display is 1080p at 60fps. I also found that through the menu, you can select 2K and 4K at 25fps!! Although I prefer the 1K at 60fps (fast).

The unit powers up and displays an image from cold start within 10 seconds.

The focal distance adjuster is of good quality however the fine focus adjustment rack is a bit grainy towards each end. Perhaps this could be fixed with some shims?

 Modifications

The power supplies that came with the kit were crap so I made my own loom and supply, attached it to the back of the wall mounted monitor so now I can turn the microscope on and off from one switch on the wall.

Summary

Apart from some general issues with the quality of the plugpacks/power supplies they shipped and the slight “grainyness” of the fine focus adjustment, the image quality is excellent if you keep the light balance right.

Well worth the purchase. It has become an invaluable part of my lab and I dont know how I was able to function without it in the first place.

Purchase

I recommend you purchase this microscope from the official Aliexpress “Eakins Micscope Store”. I have an affiliate link below which helps me out at no extra cost to you. Rest assured they will ship a genuine unit with a real Panasonic sensor.

http://ali.pub/2agr2z

DIY Tandoori Oven

Tandoori Fired Meats

Need I say more? There is something absolutely wonderful about meats cooked on skewers in a tandoori oven. The high cooking temperatures (technically unachievable by most domestic ovens), coupled with the smoke of fats and liquids falling onto glowing charcoal makes for an amazing culinary experience.

Before I built my own, I used to frequent the restaurants that had their own tandoors. Most would be gas (propane) fired and not have that charcoal fired aroma.

Then I decided, how hard could it be? I noticed a whole bunch of videos on youtube and decided to harvest the best of the knowledge and insights and design and build my own.

My requirements

I noticed a lot of diy tandoors online were either too small, too inefficient or they were too large, heavy and fixed in place.

I decided I want:

  •  decent size where I can cook for 5-10 people
  • Efficiency with minimal heat loss
  • Safe materials (avoiding zinc plating and lead containing chinese terracotta pots)
  • Portability (low weight, low height, on wheels etc). I want to be able to transport to the homes of friends and family when required.

The Design (Tandoor meats technology)

I decided that the ultimate package for the tandoor is a 44 gallon drum and not zinc plated garbage cans.

I would use a terracotta liner but one fired from virgin clay and definitely not glazed.

The insulation would be lightweight, cost effective and efficient.

So here was the shortlist of materials:

  • A 44 gallon drum that was NOT used to hold toxic chemicals or oil based products)
  • A terracotta liner / large deep tapered pot fired / made locally to ensure its quality of materials and build
  • Vermiculite as the insulation
  • Fasteners
  • A set of casters to allow the drum to be rolled around
  • Various tools for metal working

The Drum

I scored a drum from a local warehouse for $10 which had been used to transport Propylene Glycol (food frade). It was the unlined type so it meant no plastic lining inside just bare metal. Score!

The first I did was wash it out and give it a good clean.

I measured it up to work out what sized liner/pot I would need and also how high I wanted this thing so as it could fit in the back of my stationwagon.

The Liner

After scouring Gumtree and then ringing a few places, I found a pot made by a local pot maker. It was perfect!

The pot was almost 1inch thick in the walls, 400mm at the widest point, 350mm wide at the narrowest and about 450mm tall.

I cut the base off using an angle grinder fitted with a masonary cutting blade.

I then needed a place for the coal to sit. I found a bird fountain at Bunnings Hardware.

I drilled a series of holes at the base using a 12mm masonary drill bit. DO NOT use the hammer setting as it will crack your birdbath!

Modifying the Drum

I flipped the drum upside down so as I can reuse the filler as a drain in case any liquid gets into the insulation area…

I cut the drum’s base off in a manner in which I would reattach it later. I then cut the drum down so as the total height with the trimmed lid was less than 600mm.

I then found a scrap motor fan housing and used that as the prop on the base to raise the birdbath (liner base) off the drum. This will allow the insulation to wrap around the base properly and allow the air to enter the tandoor for convection. Drill enough holes to allow ash to fall through and not block up.

Attach the wheels to the base. I scored the wheels of a recycled rear projection TV…seriously hardcore wheels for the height and size!

Fitting the liner

First I laid the birdbath inside.

Then I placed the pot upside down over the top.

The alignment was just perfect!

Insulation

I found the vermiculite at a local horticultural shop and bought two bags of it.

The stuff weighs nothing! I carefully poured it in and compacted it and kept adding until i could get no more in. I had some leftover but as I discovered 6 months later, the vermiculite had settled a bit so I topped it up.

I made a lid for the tandoor using a stainless steel drinks tray I found in a thrift shop and a wooden handle off an old file.

Breaking Bad

Being an avid Breaking Bad fan, I decided to put the ol’ Golden Moth Methylamine Barrel logo on it LOL.

Modifications and Result

I modified the cut off section (base) of the drum so as I could use it as a cover over the vermiculite. I also added a temperature gauge to the lid.

UPDATE

After 2 years of use. Everything is still ok.

Parts for the Project

Below are my affiliate links with Aliexpress for the parts used in the project. I’ve researched quality and price points for the parts. It would help me out at no extra cost to you if you purchase using the links below.

0 to 800F (450C) temperature gauge – http://ali.pub/2bdlxc

0 to 1000F (500C) temperature gauge – http://ali.pub/2bdnwi